

Overview
The small cell mount is for use on canister-style small cell antennas. It is suitable for measuring correct azimuth and tilt (aka elevation).
The mount is compatible with typical canister-style antennas that have no angle in the housing (straight sides). It also has a built-in feature for fitting the Kathrein small cell antennas that have angled sides (Kathrein p/n 840 10515 or 840 10516). No special procedures are required to use the Small Cell Mount on the Kathrein antenna.
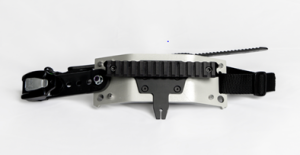
- Secure the Small Cell Mount to the Antenna
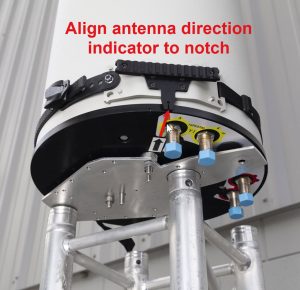
- Determine the reference spot on the antenna that indicates its direction of radiation. This can be on the bottom edge of the antenna or is sometimes found underneath the antenna on a sticker or molded in mark. The Small Cell Mount must be mounted to reference this mark. The machined notch at the bottom of the small cell mount plate indicates the position that must line up to the reference spot on the antenna.
- Pass the adjustable mount strap around the antenna and insert the tongue of the strap into the ratchet buckle.
- Pull excess nylon strap through plastic strap end, thus shortening the mount strap length.
- Note location of alignment reference mark in antenna housing.
- Use the ratchet buckle to tighten the mount to the antenna. Make sure the mount alignment notch or silver arrow is aligned with the small cell antenna reference mark.
2. Secure the AAT to the Small Cell Mount
- Attach the AAT to the AIR Mount mounting rail using the grip plate on the back of the AAT. User should feel AAT “click” into position. Tighten AAT thumbscrews to secure AAT.
- Secure AAT and Air Mount to stable structure using safety lanyard to prevent potential falling hazard.
3. Measuring, Capturing and Reporting Alignment Data
- Connect to the AAT in the standard way by powering on the AAT and connecting using WiFi or USB-C cable (see Quick Start Guide for detailed instructions). The WiFi connection can be made using the Android App (preferred) or by using WiFi and a browser.
- On the AAT Measure page, set Orientation to “Faces Front” and click Apply.
- Perform antenna adjustments to match desired alignment and save results.