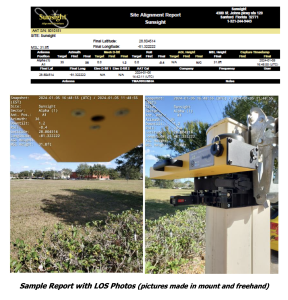
The AntennaView Camera Mount allows the user to capture Line-of-Sight photos for embedding into the AAT report. An Android device and the Sunsight App is requited to add report photos.
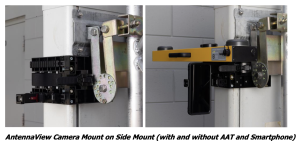 1. Secure the AntennaView Camera Mount to the AAT Side Mount
1) After the side mount is installed on the antenna, mount the ACMS in the desired position onto the lower rail of the mount and tighten using lever
2) Insert the smartphone in the mount. Use included lanyard for security.
2. Secure the AAT to the Air Antenna mount
1) Attach the AAT to the Side Mount top rail using the grip plate on the back of the AAT. User should feel AAT “click” into position. Tighten AAT thumbscrews to secure AAT.
2) Secure AAT and Side Mount to stable structure using safety lanyard to prevent potential falling hazard.
3. Measuring, Capturing and Reporting Alignment Data
1) Connect to the AAT in the standard way by powering on the AAT and connecting using the Sunsight Android App via WiFi or USB-C cable (see Quick Start Guide for detailed instructions).
2) On the AAT Measure Only page, set Orientation to “Faces Left” or ”Faces Right” and click Apply.
3) Perform antenna adjustments to match desired alignment and save results.
4) When capturing alignment results, the user will be prompted to add photos as part of the capture process. User can choose the horizon (antenna boresight) view from the AntennaView Camera Mount or remove the smartphone from the AntennaView Camera Mount to make freehand pictures as required.
5) Multiple pictures can be taken so both boresight and freehand pictures can be added to the captured alignment data